Customer Support : 020-61923200, [email protected] | Call and Trade : 020-61923220

Keltner ATR
#volatility #channel #trendfollowing
Inventor: Chester W. Keltner; modernized by Linda Bradford Raschke
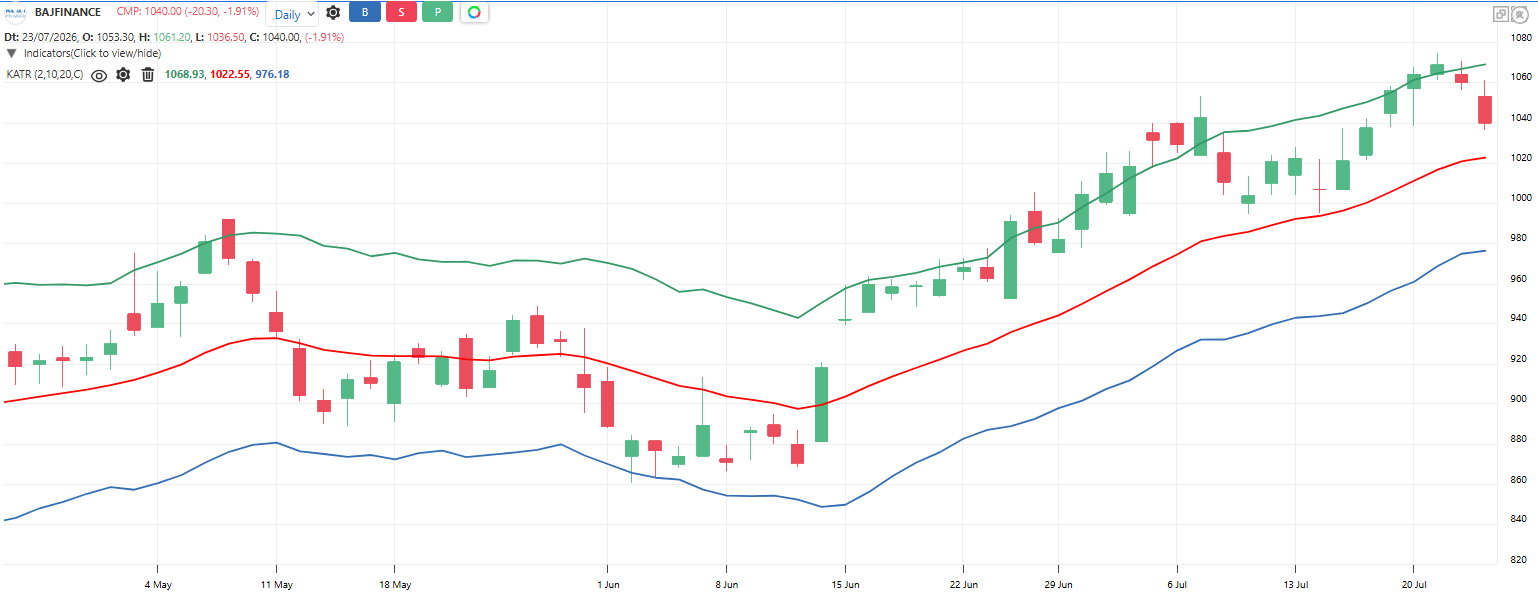
The modern Keltner Channel, popularized by Linda Raschke. The middle line is a 20 EMA of the close, with bands at 2 times ATR above and below. Two upgrades over the original: the EMA reacts faster than a simple average, and ATR includes gaps through True Range, so the bands reflect the stock’s real volatility. Reads as a trend channel: where price lives inside the channel tells the trend’s health.
Default period: 20, 10, 2 (EMA, ATR period, multiplier)
Price living in the upper half of the channel indicates uptrend. Price living in the lower half indicates downtrend.
Band width shows true volatility including gaps.
Useful readings:
Price rides between the middle line and upper band: Healthy uptrend, dips to the EMA are buyable
Price rides between the middle line and lower band: Healthy downtrend
Close above the upper band: Very strong momentum, trend day behavior
Price crosses the middle EMA: Trend side changing
Bollinger Bands squeeze inside the Keltner ATR bands: TTM Squeeze, explosive move loading
Channel width jumping: Volatility regime shifting, adjust position size
Objective rules:
Bullish: Price closes above the middle EMA AND the EMA is rising.
Bearish: Price closes below the middle EMA AND the EMA is falling.
Momentum entry: Close above the upper band, buy the first pullback that holds the middle EMA
Squeeze breakout: Bollinger Bands inside Keltner bands for 6+ bars, trade the side price breaks out
Long exit: Price closes below the middle EMA for 2 consecutive bars
Stop rule: Initial stop beyond the opposite band
What makes it unique:
Its steady ATR width makes it the calm reference frame that twitchier bands are compared against – the basis of the TTM Squeeze. It reads momentum where Bollinger reads statistics.
Click here to know more about Keltner channel and Keltner ATR bands.
The indicator table value in TradePoint & RZone also provides you with a list of all values of this indicator for any group of stocks. This will allow you to compare the readings of this indicator across different stocks.
This indicator is also available in the System Builder of RZone & TradePoint for all charting methods. Using the system builder, you can develop various strategies based on the different conditions already present in this indicator. Additionally, it can be used with other indicators or price patterns to develop effective trading strategies. For any group of stocks and market segments, you can scan and backtest stocks based on those strategies.
The indicator is applicable to all types of charting. Calculated based on the number of columns on P&F charts, bricks on Renko charts, lines on Line-break charts, candles on Heikin ashi charts, and lines on Kagi charts. While the formula and reading of the indicators remain the same, they become more dynamic on these charts.