Customer Support : 020-61923200, [email protected] | Call and Trade : 020-61923220

High Low Momentum Index
#range #channel #momentum #zone
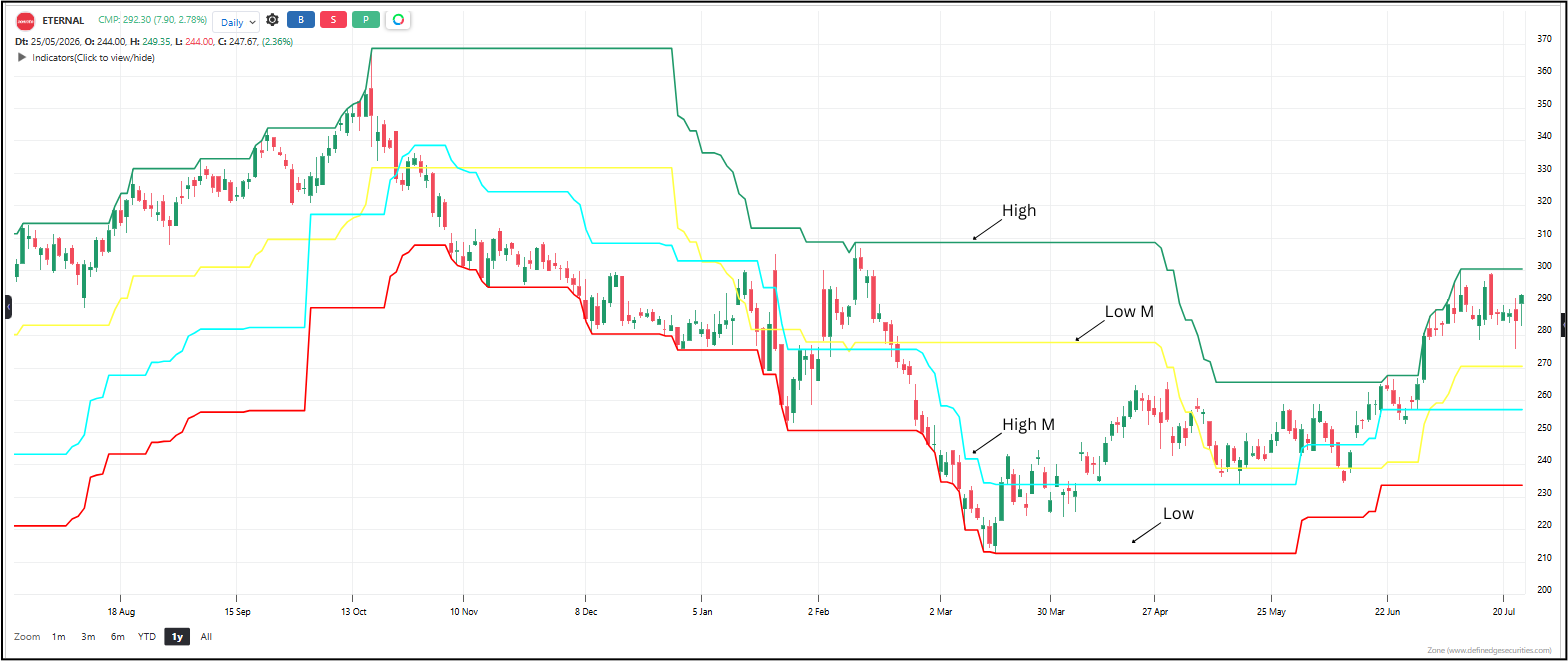
High-Low Momentum Index draws a dynamic channel using the highest high and lowest low over a rolling period. It then splits this channel into distinct zones using a middle line and two momentum lines. The space between the high and low is divided into a bullish zone, a bearish zone, and two momentum zones at the extremes. Where price sits inside this channel tells you instantly whether the market is in bullish control, bearish control, or extreme momentum territory.
Default period: 50
Line behavior: Four lines are plotted on the chart: High (rolling highest high), Low (rolling lowest low), High M (momentum line just below the high), and Low M (momentum line just above the low). A Middle line sits halfway between High and Low but is used internally, not plotted. Price moving through these lines changes the zone classification.
Useful readings:
– Price above High M — extreme bullish momentum. The market is pushing near the top of its recent range with conviction.
– Price between High M and Middle — bullish zone. Bulls are in control but momentum is moderate.
– Price between Middle and Low M — bearish zone. Bears are in control but momentum is moderate.
– Price below Low M — extreme bearish momentum. The market is pushing near the bottom of its recent range with conviction.
– Price touching the High line — the market is at its recent range ceiling. Watch for a breakout or rejection.
– Price touching the Low line — the market is at its recent range floor. Watch for a breakdown or bounce.
Objective rules:
– Go long when price moves from the Middle line up into the bullish zone (above Middle).
– Go short when price moves from the Middle line down into the bearish zone (below Middle).
– Strongest long signals occur when price crosses above High M into bullish momentum territory.
– Strongest short signals occur when price crosses below Low M into bearish momentum territory.
– Exit long when price falls back below the Middle line.
– Exit short when price rises back above the Middle line.
– When price touches the High or Low boundary lines, watch for a breakout continuation or a reversal — context matters.
What makes it unique: Instead of a single oscillator bouncing between fixed levels, this indicator builds a live channel around actual price extremes and divides it into actionable zones. You get support, resistance, trend direction, and momentum intensity — all from one set of lines on your chart.
Click here to learn more about it.
The indicator table value in TradePoint & RZone also provides you with a list of all values of this indicator for any group of stocks. This will allow you to compare the readings of this indicator across different stocks.
This indicator is also available in the System Builder of RZone & TradePoint for all charting methods. Using the system builder, you can develop various strategies based on the different conditions already present in this indicator. Additionally, it can be used with other indicators or price patterns to develop effective trading strategies. For any group of stocks and market segments, you can scan and backtest stocks based on those strategies.
The indicator is applicable to all types of charting. Calculated based on the number of columns on P&F charts, bricks on Renko charts, lines on Line-break charts, candles on Heikin ashi charts, and lines on Kagi charts. While the formula and reading of the indicators remain the same, they become more dynamic on these charts.